NetScaler MPX 15000 アプライアンスを NetScaler SDX 15000 アプライアンスに変換する
新しいソリッドステートドライブ (SSD) を介してソフトウェアをアップグレードすることで、NetScaler MPX アプライアンスを NetScaler SDX アプライアンスに変換できます。NetScaler は、NetScaler MPX アプライアンスを SDX アプライアンスに移行するためのフィールド変換キットを提供しています。
変換には8台すべてのSSDが必要です。
注
Citrix は、変換プロセスを開始する前に、アプライアンスのライトアウト管理 (LOM) ポートを構成することをお勧めします。ADC アプライアンスの LOM ポートの詳細については、「NetScaler SDX アプライアンスのライトアウト管理ポート」を参照してください。
MPX アプライアンスを SDX アプライアンスに変換するには、コンピューターまたはターミナルに接続されたコンソールケーブルを介してアプライアンスにアクセスする必要があります。コンソールケーブルを接続する前に、コンピューターまたはターミナルが次の構成をサポートするように設定してください。
- VT100 ターミナルエミュレーション
- 9600 ボー
- 8 データビット
- 1 ストップビット
- パリティおよびフロー制御は「なし」に設定
コンソールケーブルの一端をアプライアンスの RS232 シリアルポートに接続し、もう一端をコンピューターまたはターミナルに接続します。
注
RJ-45 コンバーター付きケーブルを使用するには、オプションのコンバーターをコンソールポートに挿入し、ケーブルを接続します。
変換プロセス中に LOM 接続が失われるため、Citrix® は変換プロセスを監視するために VGA モニターをアプライアンスに接続することをお勧めします。
ケーブルが接続されたら、MPXアプライアンスのコンポーネントが正常に機能していることを確認します。その後、変換を開始する準備が整います。変換プロセスでは、BIOSを変更し、Citrix Hypervisorとサービス仮想マシンイメージをインストールし、NetScaler VPXイメージをソリッドステートドライブにコピーします。
変換プロセスでは、ローカルストレージとNetScaler VPXストレージ用に独立ディスク冗長アレイ (RAID) コントローラーも設定します。SSDスロット #1 と #2 はローカルストレージに使用され、SSDスロット #3 と #4 はNetScaler VPXストレージに使用されます。
変換プロセス後、アプライアンスの構成を変更し、新しいライセンスを適用します。その後、現在NetScaler SDXアプライアンスとなっているものに、管理サービスを介してVPXインスタンスをプロビジョニングできます。
MPXアプライアンスのコンポーネントの適切な動作を確認する
- コンソールポートにアクセスし、管理者資格情報を入力します。
-
アプライアンスのコマンドラインインターフェイスから次のコマンドを実行して、シリアル番号を表示します:
show hardware。変換後、アプライアンスにログオンするためにシリアル番号が必要になる場合があります。例
> show hardware
Platform: NSMPX-15000-50G 16*CPU+128GB+4*MLX(50)+8*F1X+2*E1K+2*2-CHIP COL 520400
Manufactured on: 9/13/2017
CPU: 2100MHZ
Host Id: 1862303878
Serial no: 4VCX9CUFN6
Encoded serial no: 4VCX9CUFN6
Netscaler UUID: d9de2de3-dc89-11e7-ab53-00e0ed5de5aa
BMC Revision: 5.56
Done
<!--NeedCopy-->
Citrixテクニカルサポートに連絡したい場合、シリアル番号が役立つ場合があります。
-
アクティブなインターフェイスのステータスを表示するには、次のコマンドを実行します。
show interface例
> show interface 1) Interface 0/1 (Gig Ethernet 10/100/1000 MBits) #4 flags=0xc020 <ENABLED, UP, UP, autoneg, HAMON, HEARTBEAT, 802.1q> MTU=1500, native vlan=1, MAC=0c:c4:7a:e5:3c:50, uptime 1h08m02s Requested: media AUTO, speed AUTO, duplex AUTO, fctl OFF, throughput 0 Actual: media UTP, speed 1000, duplex FULL, fctl OFF, throughput 1000 LLDP Mode: NONE, LR Priority: 1024 RX: Pkts(19446) Bytes(1797757) Errs(0) Drops(19096) Stalls(0) TX: Pkts(368) Bytes(75619) Errs(0) Drops(0) Stalls(0) NIC: InDisc(0) OutDisc(0) Fctls(0) Stalls(0) Hangs(0) Muted(0) Bandwidth thresholds are not set. 2) Interface 0/2 (Gig Ethernet 10/100/1000 MBits) #5 flags=0x4000 <ENABLED, DOWN, down, autoneg, HEARTBEAT, 802.1q> MTU=1500, native vlan=1, MAC=0c:c4:7a:e5:3c:51, downtime 1h08m15s Requested: media AUTO, speed AUTO, duplex AUTO, fctl OFF, throughput 0 LLDP Mode: NONE, LR Priority: 1024 RX: Pkts(0) Bytes(0) Errs(0) Drops(0) Stalls(0) TX: Pkts(0) Bytes(0) Errs(0) Drops(0) Stalls(0) NIC: InDisc(0) OutDisc(0) Fctls(0) Stalls(0) Hangs(0) Muted(0) Bandwidth thresholds are not set. 3) Interface 10/1 (10G Ethernet) #6 flags=0x4000 <ENABLED, DOWN, down, autoneg, HAMON, HEARTBEAT, 802.1q> MTU=1500, native vlan=200, MAC=00:e0:ed:5d:e5:76, downtime 1h08m15s Requested: media AUTO, speed AUTO, duplex AUTO, fctl OFF, throughput 0 LLDP Mode: NONE, LR Priority: 1024 RX: Pkts(0) Bytes(0) Errs(0) Drops(0) Stalls(0) TX: Pkts(0) Bytes(0) Errs(0) Drops(0) Stalls(0) NIC: InDisc(0) OutDisc(0) Fctls(0) Stalls(0) Hangs(0) Muted(0) Bandwidth thresholds are not set. Rx Ring: Configured size=2048, Actual size=512, Type: Elastic 4) Interface 10/2 (10G Ethernet) #7 flags=0x4000 <ENABLED, DOWN, down, autoneg, HEARTBEAT, 802.1q> MTU=1500, native vlan=200, MAC=00:e0:ed:5d:e5:77, downtime 1h08m15s Requested: media AUTO, speed AUTO, duplex AUTO, fctl OFF, throughput 0 LLDP Mode: NONE, LR Priority: 1024 RX: Pkts(0) Bytes(0) Errs(0) Drops(0) Stalls(0) TX: Pkts(0) Bytes(0) Errs(0) Drops(0) Stalls(0) NIC: InDisc(0) OutDisc(0) Fctls(0) Stalls(0) Hangs(0) Muted(0) Bandwidth thresholds are not set. Rx Ring: Configured size=2048, Actual size=512, Type: Elastic 5) Interface 10/3 (10G Ethernet) #8 flags=0x4000 <ENABLED, DOWN, down, autoneg, HEARTBEAT, 802.1q> MTU=1500, native vlan=1, MAC=00:e0:ed:5d:e5:78, downtime 1h08m15s Requested: media AUTO, speed AUTO, duplex AUTO, fctl OFF, throughput 0 LLDP Mode: NONE, LR Priority: 1024 RX: Pkts(0) Bytes(0) Errs(0) Drops(0) Stalls(0) TX: Pkts(0) Bytes(0) Errs(0) Drops(0) Stalls(0) NIC: InDisc(0) OutDisc(0) Fctls(0) Stalls(0) Hangs(0) Muted(0) Bandwidth thresholds are not set. Rx Ring: Configured size=2048, Actual size=512, Type: Elastic 6) Interface 10/4 (10G Ethernet) #9 flags=0x4000 <ENABLED, DOWN, down, autoneg, HEARTBEAT, 802.1q> MTU=1500, native vlan=1, MAC=00:e0:ed:5d:e5:79, downtime 1h08m15s Requested: media AUTO, speed AUTO, duplex AUTO, fctl OFF, throughput 0 LLDP Mode: NONE, LR Priority: 1024 RX: Pkts(0) Bytes(0) Errs(0) Drops(0) Stalls(0) TX: Pkts(0) Bytes(0) Errs(0) Drops(0) Stalls(0) NIC: InDisc(0) OutDisc(0) Fctls(0) Stalls(0) Hangs(0) Muted(0) Bandwidth thresholds are not set. Rx Ring: Configured size=2048, Actual size=512, Type: Elastic 7) Interface 10/5 (10G Ethernet) #0 flags=0x4000 <ENABLED, DOWN, down, autoneg, HEARTBEAT, 802.1q> MTU=1500, native vlan=1, MAC=00:e0:ed:5d:e5:aa, downtime 1h08m15s Requested: media AUTO, speed AUTO, duplex AUTO, fctl OFF, throughput 0 LLDP Mode: NONE, LR Priority: 1024 RX: Pkts(0) Bytes(0) Errs(0) Drops(0) Stalls(0) TX: Pkts(0) Bytes(0) Errs(0) Drops(0) Stalls(0) NIC: InDisc(0) OutDisc(0) Fctls(0) Stalls(0) Hangs(0) Muted(0) Bandwidth thresholds are not set. Rx Ring: Configured size=2048, Actual size=512, Type: Elastic 8) Interface 10/6 (10G Ethernet) #1 flags=0x4000 <ENABLED, DOWN, down, autoneg, HEARTBEAT, 802.1q> MTU=1500, native vlan=1, MAC=00:e0:ed:5d:e5:ab, downtime 1h08m15s Requested: media AUTO, speed AUTO, duplex AUTO, fctl OFF, throughput 0 LLDP Mode: NONE, LR Priority: 1024 RX: Pkts(0) Bytes(0) Errs(0) Drops(0) Stalls(0) TX: Pkts(0) Bytes(0) Errs(0) Drops(0) Stalls(0) NIC: InDisc(0) OutDisc(0) Fctls(0) Stalls(0) Hangs(0) Muted(0) Bandwidth thresholds are not set. Rx Ring: Configured size=2048, Actual size=512, Type: Elastic 9) Interface 10/7 (10G Ethernet) #2 flags=0x4000 <ENABLED, DOWN, down, autoneg, HEARTBEAT, 802.1q> MTU=1500, native vlan=1, MAC=00:e0:ed:5d:e5:ac, downtime 1h08m15s Requested: media AUTO, speed AUTO, duplex AUTO, fctl OFF, throughput 0 LLDP Mode: NONE, LR Priority: 1024 RX: Pkts(0) Bytes(0) Errs(0) Drops(0) Stalls(0) TX: Pkts(0) Bytes(0) Errs(0) Drops(0) Stalls(0) NIC: InDisc(0) OutDisc(0) Fctls(0) Stalls(0) Hangs(0) Muted(0) Bandwidth thresholds are not set. Rx Ring: Configured size=2048, Actual size=512, Type: Elastic 10) Interface 10/8 (10G Ethernet) #3 flags=0x4000 <ENABLED, DOWN, down, autoneg, HEARTBEAT, 802.1q> MTU=1500, native vlan=1, MAC=00:e0:ed:5d:e5:ad, downtime 1h08m15s Requested: media AUTO, speed AUTO, duplex AUTO, fctl OFF, throughput 0 LLDP Mode: NONE, LR Priority: 1024 RX: Pkts(0) Bytes(0) Errs(0) Drops(0) Stalls(0) TX: Pkts(0) Bytes(0) Errs(0) Drops(0) Stalls(0) NIC: InDisc(0) OutDisc(0) Fctls(0) Stalls(0) Hangs(0) Muted(0) Bandwidth thresholds are not set. Rx Ring: Configured size=2048, Actual size=512, Type: Elastic 11) Interface 50/1 (50G Ethernet) #13 flags=0x4000 <ENABLED, DOWN, down, autoneg, HEARTBEAT, 802.1q> MTU=1500, native vlan=1, MAC=24:8a:07:a3:1f:84, downtime 1h08m22s Requested: media AUTO, speed AUTO, duplex AUTO, fctl OFF, throughput 0 LLDP Mode: NONE, LR Priority: 1024 RX: Pkts(0) Bytes(0) Errs(0) Drops(0) Stalls(0) TX: Pkts(0) Bytes(0) Errs(0) Drops(0) Stalls(0) NIC: InDisc(0) OutDisc(0) Fctls(0) Stalls(0) Hangs(0) Muted(0) Bandwidth thresholds are not set. 12) Interface 50/2 (50G Ethernet) #12 flags=0x4000 <ENABLED, DOWN, down, autoneg, HEARTBEAT, 802.1q> MTU=1500, native vlan=1, MAC=24:8a:07:a3:1f:6c, downtime 1h08m22s Requested: media AUTO, speed AUTO, duplex AUTO, fctl OFF, throughput 0 LLDP Mode: NONE, LR Priority: 1024 RX: Pkts(0) Bytes(0) Errs(0) Drops(0) Stalls(0) TX: Pkts(0) Bytes(0) Errs(0) Drops(0) Stalls(0) NIC: InDisc(0) OutDisc(0) Fctls(0) Stalls(0) Hangs(0) Muted(0) Bandwidth thresholds are not set. 13) Interface 50/3 (50G Ethernet) #11 flags=0x4000 <ENABLED, DOWN, down, autoneg, HEARTBEAT, 802.1q> MTU=1500, native vlan=1, MAC=24:8a:07:a3:1f:98, downtime 1h08m22s Requested: media AUTO, speed AUTO, duplex AUTO, fctl OFF, throughput 0 LLDP Mode: NONE, LR Priority: 1024 RX: Pkts(0) Bytes(0) Errs(0) Drops(0) Stalls(0) TX: Pkts(0) Bytes(0) Errs(0) Drops(0) Stalls(0) NIC: InDisc(0) OutDisc(0) Fctls(0) Stalls(0) Hangs(0) Muted(0) Bandwidth thresholds are not set. 14) Interface 50/4 (50G Ethernet) #10 flags=0x4000 <ENABLED, DOWN, down, autoneg, HEARTBEAT, 802.1q> MTU=1500, native vlan=1, MAC=24:8a:07:94:b9:b6, downtime 1h08m22s Requested: media AUTO, speed AUTO, duplex AUTO, fctl OFF, throughput 0 LLDP Mode: NONE, LR Priority: 1024 RX: Pkts(0) Bytes(0) Errs(0) Drops(0) Stalls(0) TX: Pkts(0) Bytes(0) Errs(0) Drops(0) Stalls(0) NIC: InDisc(0) OutDisc(0) Fctls(0) Stalls(0) Hangs(0) Muted(0) Bandwidth thresholds are not set. 15) Interface LO/1 (Netscaler Loopback interface) #14 flags=0x20008020 <ENABLED, UP, UP> MTU=1500, native vlan=1, MAC=0c:c4:7a:e5:3c:50, uptime 1h08m18s LLDP Mode: NONE, LR Priority: 1024 RX: Pkts(5073645) Bytes(848299459) Errs(0) Drops(0) Stalls(0) TX: Pkts(9923625) Bytes(968741778) Errs(0) Drops(0) Stalls(0) Bandwidth thresholds are not set. Done <!--NeedCopy--> -
show interface コマンドの出力で、すべてのインターフェイスが有効になっており、各インターフェイスのステータスがUP/UPと表示されていることを確認します。
注: > >- インターフェイスのステータスは、ケーブルがインターフェイスに接続されている場合にのみUP/UPと表示されます。 > >- すべてのポートにSFP+トランシーバーがない場合は、段階的にインターフェイスを確認してください。最初のインターフェイスセットを確認した後、SFP+トランシーバーを抜き、次のポートセットに差し込みます。
-
UP/UP状態ではない各インターフェイスに対して、次のコマンドを実行します。
> enable interface 50/1
  Done
> enable interface 50/2
  Done
> enable interface 50/3
  Done
> enable interface 50/4
  Done
<!--NeedCopy-->
ここでxは新しいインターフェイス番号です
-
電源の状態が正常であることを確認するには、次のコマンドを実行します。
stat system –detail例
> stat system -detail NetScaler Executive View System Information: Up since Sat Dec 5 04:17:29 2020 Up since(Local) Sat Dec 5 04:17:29 2020 Memory usage (MB) 4836 InUse Memory (%) 4.08 Number of CPUs 13 System Health Statistics (Standard): CPU 0 Core Voltage (Volts) 1.80 CPU 1 Core Voltage (Volts) 1.80 Main 3.3 V Supply Voltage 3.35 Standby 3.3 V Supply Voltage 3.23 +5.0 V Supply Voltage 5.00 +12.0 V Supply Voltage 12.06 Battery Voltage (Volts) 3.02 Intel CPU Vtt Power(Volts) 0.00 5V Standby Voltage(Volts) 4.95 Voltage Sensor2(Volts) 0.00 CPU Fan 0 Speed (RPM) 3500 CPU Fan 1 Speed (RPM) 3600 System Fan Speed (RPM) 3600 System Fan 1 Speed (RPM) 3600 System Fan 2 Speed (RPM) 3500 CPU 0 Temperature (Celsius) 37 CPU 1 Temperature (Celsius) 47 Internal Temperature (Celsius) 26 Power supply 1 status NORMAL Power supply 2 status NORMAL Power supply 3 status NOT SUPPORTED Power supply 4 status NOT SUPPORTED System Disk Statistics: /flash Size (MB) 23801 /flash Used (MB) 7009 /flash Available (MB) 14887 /flash Used (%) 32 /var Size (MB) 341167 /var Used (MB) 56502 /var Available (MB) 257371 /var Used (%) 18 System Health Statistics(Auxiliary): Voltage 0 (Volts) 1.20 Voltage 1 (Volts) 1.20 Voltage 2 (Volts) 1.20 Voltage 3 (Volts) 1.20 Voltage 4 (Volts) 1.54 Voltage 5 (Volts) 0.00 Voltage 6 (Volts) 0.00 Voltage 7 (Volts) 0.00 Fan 0 Speed (RPM) 3600 Fan 1 Speed (RPM) 0 Fan 2 Speed (RPM) 0 Fan 3 Speed (RPM) 0 Temperature 0 (Celsius) 24 Temperature 1 (Celsius) 30 Temperature 2 (Celsius) 0 Temperature 3 (Celsius) 0 Done <!--NeedCopy--> -
システム構成データと統計情報の tar を生成するには、次のコマンドを実行します。
show techsupport例
> show techsupport

showtechsupport data collector tool - $Revision$!
NetScaler version 13.0
The NS IP of this box is 10.217.206.43
This is not HA configuration
Copying selected configuration files ....
Running shell commands ....
Running CLI show commands ....
Collecting ns running configuration....
Collecting running gslb configuration....
Running CLI stat commands ....
Running vtysh commands ....
Copying newnslog files ....
Copying core files from /var/core ....
Copying core files from /var/crash ....
Copying GSLB location database files ....
Copying GSLB auto sync log files ....
Copying Safenet Gateway log files ....
Copying messages, ns.log, dmesg and other log files ....
Creating archive ....
/var/tmp/support/support.tgz  ---- points to ---> /var/tmp/support/collector_P_10.217.206.43_5Dec2020_05_32.tar.gz

showtechsupport script took 1 minute(s) and 17 second(s) to execute.
Done
<!--NeedCopy-->
注
コマンドの出力は、/var/tmp/support/collector_<IP_address>_P_<date>.tar.gz ファイルで確認できます。このファイルを別のコンピューターにコピーして、将来の参照用に保管してください。このコマンドの出力は、Citrix テクニカルサポートに問い合わせる際に役立つ場合があります。
-
コマンドラインインターフェイスで、シェルプロンプトに切り替えます。次のように入力します:
shell例
> shell Copyright (c) 1992-2013 The FreeBSD Project. Copyright (c) 1979, 1980, 1983, 1986, 1988, 1989, 1991, 1992, 1993, 1994 The Regents of the University of California. All rights reserved. root@ns# <!--NeedCopy--> -
アプライアンスに応じて利用可能な Cavium カードの数を確認するには、次のコマンドを実行します。
root@ns# grep "memory" /var/nslog/dmesg.boot例
root@ns# grep "memory" /var/nslog/dmesg.boot real memory = 139586437120 (133120 MB) avail memory = 132710871040 (126562 MB) root@ns# <!--NeedCopy--> -
アプライアンスに応じて CPU コアの数を確認するには、次のコマンドを実行します。
root@ns# grep "cpu" /var/nslog/dmesg.boot例
root@ns# grep "cpu" /var/nslog/dmesg.boot cpu0 (BSP): APIC ID: 0 cpu1 (AP): APIC ID: 2 cpu2 (AP): APIC ID: 4 cpu3 (AP): APIC ID: 6 cpu4 (AP): APIC ID: 8 cpu5 (AP): APIC ID: 10 cpu6 (AP): APIC ID: 12 cpu7 (AP): APIC ID: 14 cpu8 (AP): APIC ID: 16 cpu9 (AP): APIC ID: 18 cpu10 (AP): APIC ID: 20 cpu11 (AP): APIC ID: 22 cpu12 (AP): APIC ID: 24 cpu13 (AP): APIC ID: 26 cpu14 (AP): APIC ID: 28 cpu15 (AP): APIC ID: 30 cpu0: <ACPI CPU> on acpi0 cpu1: <ACPI CPU> on acpi0 cpu2: <ACPI CPU> on acpi0 cpu3: <ACPI CPU> on acpi0 cpu4: <ACPI CPU> on acpi0 cpu5: <ACPI CPU> on acpi0 cpu6: <ACPI CPU> on acpi0 cpu7: <ACPI CPU> on acpi0 cpu8: <ACPI CPU> on acpi0 cpu9: <ACPI CPU> on acpi0 cpu10: <ACPI CPU> on acpi0 cpu11: <ACPI CPU> on acpi0 cpu12: <ACPI CPU> on acpi0 cpu13: <ACPI CPU> on acpi0 cpu14: <ACPI CPU> on acpi0 cpu15: <ACPI CPU> on acpi0 est0: <Enhanced SpeedStep Frequency Control> on cpu0 p4tcc0: <CPU Frequency Thermal Control> on cpu0 est1: <Enhanced SpeedStep Frequency Control> on cpu1 p4tcc1: <CPU Frequency Thermal Control> on cpu1 est2: <Enhanced SpeedStep Frequency Control> on cpu2 p4tcc2: <CPU Frequency Thermal Control> on cpu2 est3: <Enhanced SpeedStep Frequency Control> on cpu3 p4tcc3: <CPU Frequency Thermal Control> on cpu3 est4: <Enhanced SpeedStep Frequency Control> on cpu4 p4tcc4: <CPU Frequency Thermal Control> on cpu4 est5: <Enhanced SpeedStep Frequency Control> on cpu5 p4tcc5: <CPU Frequency Thermal Control> on cpu5 est6: <Enhanced SpeedStep Frequency Control> on cpu6 p4tcc6: <CPU Frequency Thermal Control> on cpu6 est7: <Enhanced SpeedStep Frequency Control> on cpu7 p4tcc7: <CPU Frequency Thermal Control> on cpu7 est8: <Enhanced SpeedStep Frequency Control> on cpu8 p4tcc8: <CPU Frequency Thermal Control> on cpu8 est9: <Enhanced SpeedStep Frequency Control> on cpu9 p4tcc9: <CPU Frequency Thermal Control> on cpu9 est10: <Enhanced SpeedStep Frequency Control> on cpu10 p4tcc10: <CPU Frequency Thermal Control> on cpu10 est11: <Enhanced SpeedStep Frequency Control> on cpu11 p4tcc11: <CPU Frequency Thermal Control> on cpu11 est12: <Enhanced SpeedStep Frequency Control> on cpu12 p4tcc12: <CPU Frequency Thermal Control> on cpu12 est13: <Enhanced SpeedStep Frequency Control> on cpu13 p4tcc13: <CPU Frequency Thermal Control> on cpu13 est14: <Enhanced SpeedStep Frequency Control> on cpu14 p4tcc14: <CPU Frequency Thermal Control> on cpu14 est15: <Enhanced SpeedStep Frequency Control> on cpu15 p4tcc15: <CPU Frequency Thermal Control> on cpu15 root@ns# <!--NeedCopy--> -
/var ドライブが
/dev/ ar0s1a: root@ns# df –hとしてマウントされていることを確認するには、次のコマンドを実行します。例
root@ns# df -h Filesystem Size Used Avail Capacity Mounted on /dev/md0 422M 404M 9.1M 98% / devfs 1.0k 1.0k 0B 100% /dev procfs 4.0k 4.0k 0B 100% /proc /dev/ar0s1a 23G 6.9G 14G 32% /flash /dev/ar0s1e 333G 32G 274G 10% /var root@ns# <!--NeedCopy--> -
潜在的なハードウェアエラーをチェックする ns_hw_err.bash スクリプトを実行するには、次のコマンドを入力します: root@ns
# ns_hw_err.bash例
root@ns# ns_hw_err.bash NetScaler NS13.0: Build 71.3602.nc, Date: Nov 12 2020, 07:26:41 (64-bit) platform: serial 4VCX9CUFN6 platform: sysid 520400 - NSMPX-15000-50G 16*CPU+128GB+4*MLX(50)+8*F1X+2*E1K+2*2-CHIP COL 8955 HDD MODEL: ar0: 434992MB <Intel MatrixRAID RAID1> status: READY Generating the list of newnslog files to be processed... Generating the events from newnslog files... Checking for HDD errors... Checking for HDD SMART errors... Checking for Flash errors... Checking for Mega Raid Controller errors... Checking for SSL errors... Dec 5 06:00:31 <daemon.err> ns monit[996]: 'safenet_gw' process is not running Checking for BIOS errors... Checking for SMB errors... Checking for MotherBoard errors... Checking for CMOS errors... License year: 2020: OK Checking for SFP/NIC errors... Dec 5 06:02:32 <daemon.err> ns monit[996]: 'safenet_gw' process is not running Checking for Firmware errors... Checking for License errors... Checking for Undetected CPUs... Checking for DIMM flaps... Checking for Memory Channel errors... Checking for LOM errors... Checking the Power Supply Errors... Checking for Hardware Clock errors... Script Done. root@ns# <!--NeedCopy--> -
重要: 管理ポートを含む LOM ポート以外のすべてのポートをネットワークから物理的に切断します。
-
シェルプロンプトで、ADC コマンドラインに切り替えます。次のように入力します: exit
例
root@ns# exit logout Done <!--NeedCopy--> -
アプライアンスをシャットダウンするには、次のコマンドを実行します。ADC を完全に停止するかどうかを尋ねられます。次のように入力します:
shutdown -p now例
> shutdown -p now
Are you sure you want to completely stop NetScaler (Y/N)? [N]:y
Done
> Dec  5 06:09:11 <auth.notice> ns shutdown: power-down by root:
Dec  5 06:09:13 <auth.emerg> ns init: Rebooting via init mechanism
Dec  5 06:09:13 <syslog.err> ns syslogd: exiting on signal 15
Dec  5 06:09:13 aslearn[1662]: before pthread_join(), task name: Aslearn_Packet_Loop_Task
Dec  5 06:09:15 aslearn[1662]: Exiting function ns_do_logging
Dec  5 06:09:15 aslearn[1662]: before pthread_join(), task name: Aslearn_WAL_Cleanup_Task
Dec  5 06:09:15 aslearn[1662]: before pthread_join(), task name: Aslearn_HA_Primary_Task
Dec  5 06:09:15 aslearn[1662]: 1662 exiting gracefully
Dec  5 06:09:18 [1672]: nsnet_tcpipconnect: connect() failed; returned -1 errno=61
qat0: qat_dev0 stopped 12 acceleration engines
pci4: Resetting device
qat1: qat_dev1 stopped 12 acceleration engines
pci6: Resetting device
qat2: qat_dev2 stopped 12 acceleration engines
pci132: Resetting device
qat3: qat_dev3 stopped 12 acceleration engines
pci134: Resetting device
Dec  5 06:09:33 init: some processes would not die; ps axl advised
reboot initiated by init with parent kernel
Waiting (max 60 seconds) for system process `vnlru' to stop...done
Waiting (max 60 seconds) for system process `bufdaemon' to stop...done
Waiting (max 60 seconds) for system process `syncer' to stop...
Syncing disks, vnodes remaining...0 0 0 done
All buffers synced.
Uptime: 1h53m18s
ixl_shutdown: lldp start 0
ixl_shutdown: lldp start 0
ixl_shutdown: lldp start 0
ixl_shutdown: lldp start 0
usbus0: Controller shutdown
uhub0: at usbus0, port 1, addr 1 (disconnected)
usbus0: Controller shutdown complete
usbus1: Controller shutdown
uhub1: at usbus1, port 1, addr 1 (disconnected)
ugen1.2: <vendor 0x8087> at usbus1 (disconnected)
uhub3: at uhub1, port 1, addr 2 (disconnected)
ugen1.3: <FTDI> at usbus1 (disconnected)
uftdi0: at uhub3, port 1, addr 3 (disconnected)
ugen1.4: <vendor 0x1005> at usbus1 (disconnected)
umass0: at uhub3, port 3, addr 4 (disconnected)
(da0:umass-sim0:0:0:0): lost device - 0 outstanding, 0 refs
(da0:umass-sim0:0:0:0): removing device entry
usbus1: Controller shutdown complete
usbus2: Controller shutdown
uhub2: at usbus2, port 1, addr 1 (disconnected)
 ugen2.2: <vendor 0x8087> at usbus2 (disconnected)
uhub4: at uhub2, port 1, addr 2 (disconnected)
ugen2.3: <vendor 0x0557> at usbus2 (disconnected)
uhub5: at uhub4, port 7, addr 3 (disconnected)
ugen2.4: <vendor 0x0557> at usbus2 (disconnected)
ukbd0: at uhub5, port 1, addr 4 (disconnected)
ums0: at uhub5, port 1, addr 4 (disconnected)
usbus2: Controller shutdown complete
ixl_shutdown: lldp start 0
ixl_shutdown: lldp start 0
ixl_shutdown: lldp start 0
ixl_shutdown: lldp start 0
acpi0: Powering system off
<!--NeedCopy-->
アプライアンスをアップグレードする
アプライアンスをアップグレードするには、次の手順に従います。
- ADC アプライアンスの電源を切ります。
-
次の図に示すように、アプライアンスの背面にあるスロット #1 とスロット #2 にある2つのソリッドステートドライブ (SSD) を見つけます。
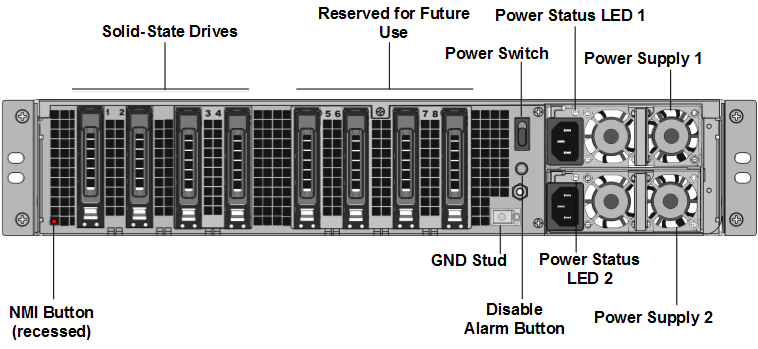
-
交換用のソリッドステートドライブ (SSD) が、お使いのADCモデルに必要なものであることを確認します。変換には最低4台のSSDが必要です。NetScalerのラベルは、いずれかのSSDの上面にあります。このSSDには、新しいバージョンのBIOSと、必要なNetScaler SDX Management Serviceの最新ビルドが事前に搭載されています。このSSDはスロット#1に取り付ける必要があります。
-
ドライブカバーの安全ラッチを押し下げながら、ドライブハンドルを引いてSSDを取り外します。
-
新しいNetScaler®認定SSDドライブで、ドライブハンドルを左に完全に開きます。次に、新しいドライブをスロット#1にできるだけ奥まで挿入します。
-
ドライブを固定するには、ハンドルをアプライアンスの背面と面一になるように閉じ、ドライブがスロットにしっかりとロックされるようにします。
重要: SSDの向きは重要です。ドライブを挿入するときは、NetScaler製品ラベルが側面にあることを確認してください。
-
スロット#1のSSDの容量と一致する2台目のNetScaler認定SSDをスロット#2に挿入します。
注: アプライアンスのライセンスが14040 40G、14060 40G、14080 40Gの場合、さらに空のNetScaler認定SSDをスロット#3、#4、#5、#6に挿入します。
NetScaler SDXモデル 含まれる仮想インスタンス プラットフォームの最大値 ベースモデルに含まれるSSD 最大インスタンス用の追加SSD SDX 15020/SDX 15020-50G 5 55 240 GBのRAID対応リムーバブルブートソリッドステートドライブ(SSD)2台(スロット1および2)。240 GBのRAID対応リムーバブルストレージリポジトリ(スロット3および4がペア)SSD 2台、および480 GBのストレージリポジトリ(スロット5~6がペア、7~8がペア)SSD 4台。 NA SDX 15030/SDX 15030-50G 20 55 240 GBのRAID対応リムーバブルブートソリッドステートドライブ(SSD)2台(スロット1および2)。240 GBのRAID対応リムーバブルストレージリポジトリ(スロット3および4がペア)SSD 2台、および480 GBのストレージリポジトリ(スロット5~6がペア、7~8がペア)SSD 4台。 NA 重要
新旧のSSDの混在はサポートされていません。最初のRAIDペア(ローカルストレージ)を構成するスロット1とスロット2のSSDは、同じサイズとタイプである必要があります。同様に、2番目のRAIDペア(VPXストレージ)を構成するスロット3とスロット4のSSDも、同じサイズとタイプである必要があります。提供された変換キットに含まれるドライブのみを使用してください。
-
データポートと管理ポートからすべてのネットワークケーブルを取り外します。
-
ADCアプライアンスを起動します。手順については、「ハードウェアのインストール」の「アプライアンスの電源を入れる」を参照してください。
変換プロセスは約30分間実行され、その間、アプライアンスの電源を入れ直さないでください。変換プロセス全体がコンソールに表示されず、応答しないように見える場合があります。
変換プロセスでは、BIOSが更新され、Citrix Hypervisorと管理サービスオペレーティングシステムがインストールされます。また、インスタンスプロビジョニングのためにNetScaler VPXイメージをSSDにコピーし、Raid1ペアを形成します。
注: アプライアンスのシリアル番号は変更されません。
-
変換プロセス中はコンソールケーブルを接続したままにしてください。プロセスが完了すると、SDXログインプロンプトが表示されます。
-
変換プロセス中に、LOMポート接続が失われる可能性があります。これは、IPアドレスがデフォルト値の192.168.1.3にリセットされるためです。変換ステータスの出力はVGAモニターで確認できます。
-
アプライアンスがMPXからSDXに変換された後、Citrix Hypervisorのデフォルトの資格情報はroot/nsrootに変更されます。このパスワードが機能しない場合は、nsroot/アプライアンスのシリアル番号を入力してみてください。シリアル番号のバーコードはアプライアンスの背面にあり、
show hardwareコマンドの出力でも確認できます。 - 変換が成功したことを確認するには、FVTの結果が成功を示していることを確認します。次のコマンドを実行します: tail /var/log/fvt/fvt.log
変換されたアプライアンスを再構成する
変換プロセス後、アプライアンスには以前の動作構成がありません。そのため、デフォルトのIPアドレス192.168.100.1/16を使用してのみ、Webブラウザ経由でアプライアンスにアクセスできます。ネットワーク192.168.0.0上のコンピューターを設定し、クロスオーバーイーサネットケーブルを使用してアプライアンスの管理ポート(0/1)に直接接続します。または、ストレートイーサネットケーブルを使用してネットワークハブ経由でNetScaler SDXアプライアンスにアクセスします。デフォルトの資格情報を使用してログオンし、次の操作を行います。
- [Configuration] タブを選択します。
- [System Resource] セクションに、NetScaler SDXアプライアンスのCPUコア数、SSLコア数、および合計メモリが正確に表示されていることを確認します。
- System ノードを選択し、Set Up Appliance の下にある Network Configuration をクリックして、Management Serviceのネットワーク情報を変更します。
-
Modify Network Configuration ダイアログボックスで、次の詳細を指定します。
- インターフェイス*—クライアントがManagement Serviceに接続するインターフェイス。可能な値: 0/1, 0/2。デフォルト: 0/1。
- Citrix Hypervisor™ IPアドレス*—Citrix HypervisorのIPアドレス。
- Management Service IPアドレス*—Management ServiceのIPアドレス。
- ネットマスク*—SDXアプライアンスが配置されているサブネットのサブネットマスク。
- ゲートウェイ*—ネットワークのデフォルトゲートウェイ。
- DNSサーバー — DNSサーバーのIPアドレス。
*必須パラメーター
-
OKをクリックします。ネットワーク情報が変更されたため、管理サービスへの接続が失われます。
-
NetScaler SDXアプライアンスの管理ポート0/1をスイッチに接続して、ネットワーク経由でアクセスします。以前使用したIPアドレスに移動し、デフォルトの資格情報でログオンします。
-
新しいライセンスを適用します。手順については、「SDXライセンスの概要」を参照してください。
- Configuration > Systemに移動し、System AdministrationグループでReboot Applianceをクリックします。Yesをクリックして確定します。これで、NetScaler SDXアプライアンスにVPXインスタンスをプロビジョニングする準備ができました。手順については、「NetScalerインスタンスのプロビジョニング」を参照してください。